
Grey Paper Backdrops are a fundamental element in the studios of numerous photographers. They are versatile, cost-effective, and user-friendly, making them an excellent option for various photography genres, including portraits, product photography, and fashion photography. Gray paper backdrops serve as a versatile and economical tool, allowing for the creation of various looks in photography. With some practice, mastering the use of a gray paper backdrop enables you to produce professional-looking images
Written by Andrew Samuel Basson

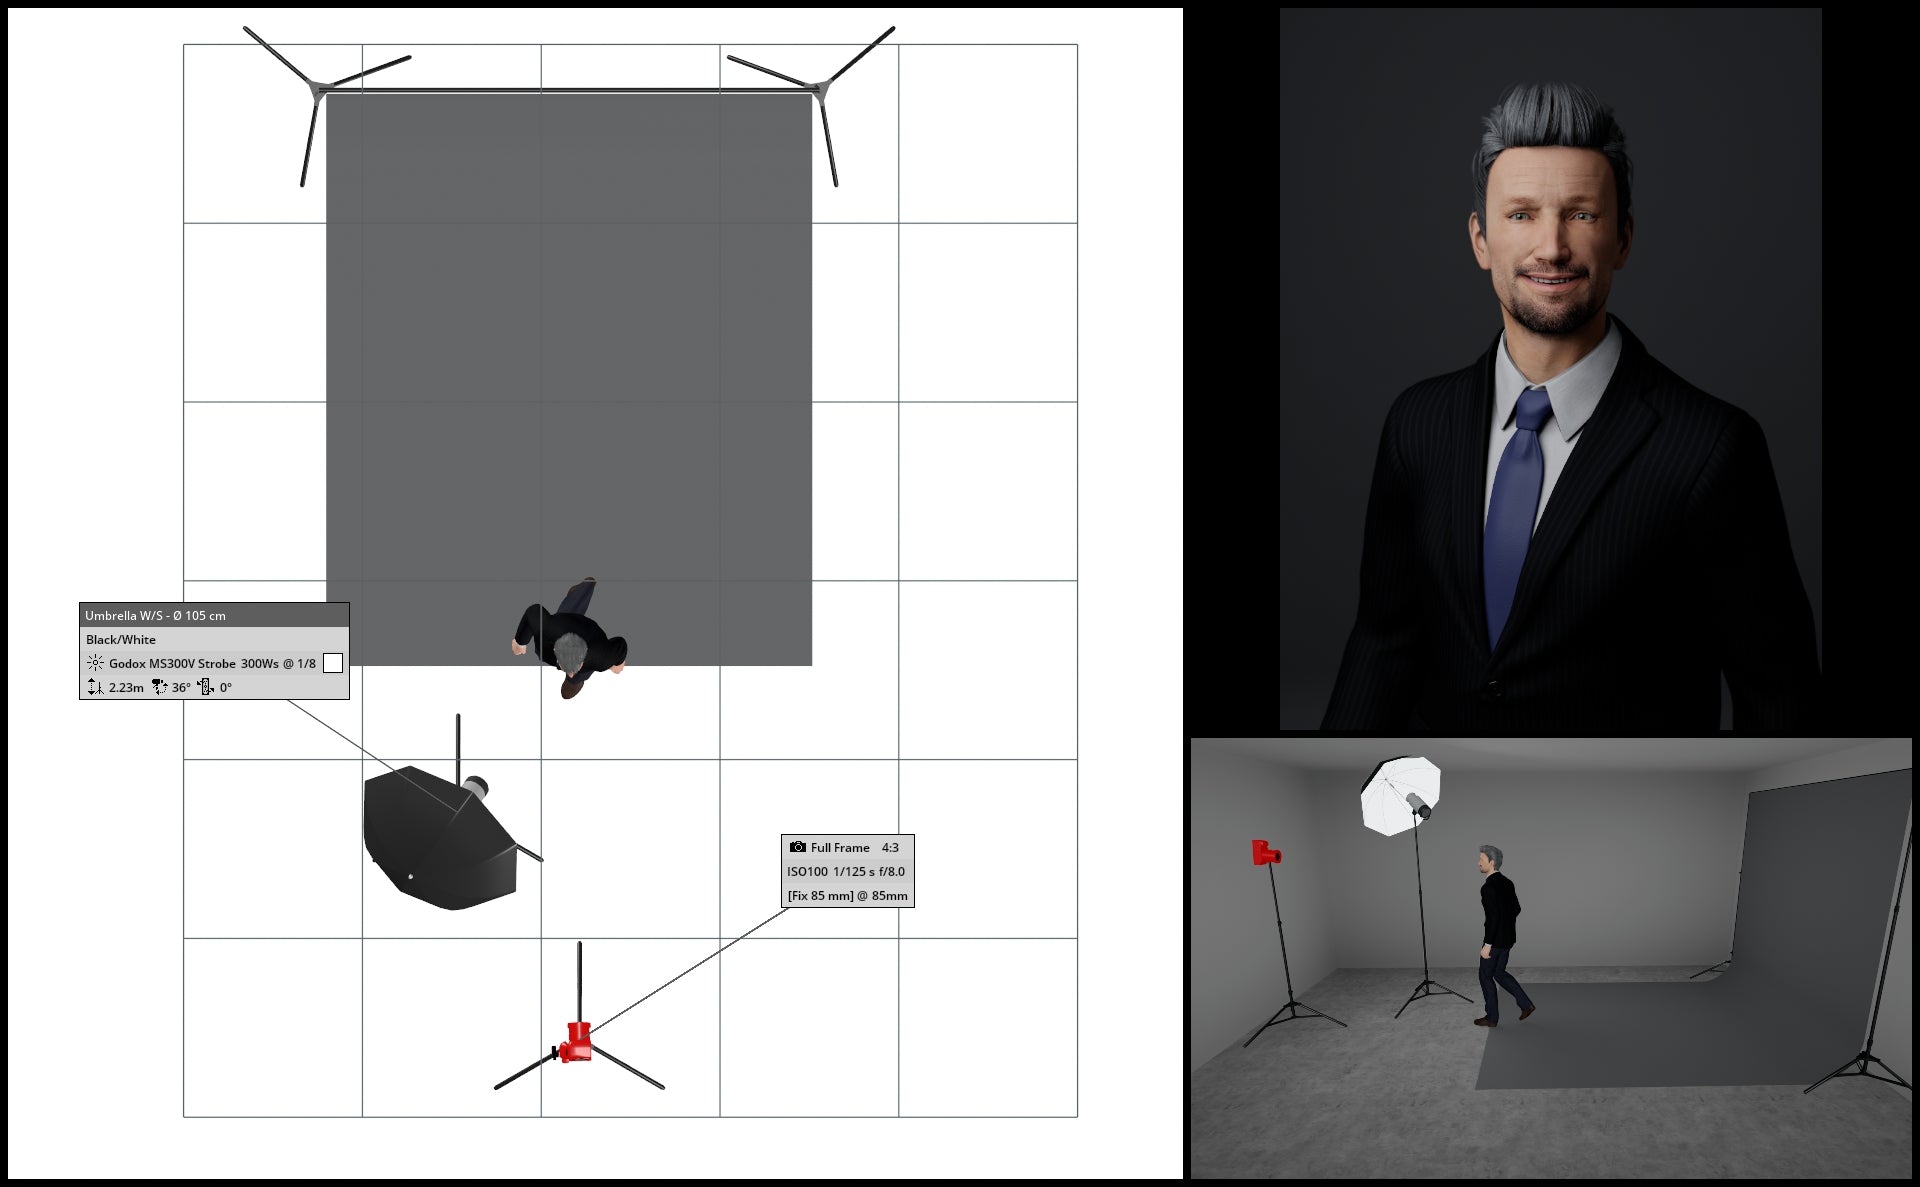
(above) Andrew Basson's home setup
Andrew Basson uses:
- Godox MS300 300w Strobe
- Hylow Curved Reflector
- Godox 101cm Umbrella Softbox
- Hylow 240cm Stands
- Colortone Grey Paper Backdrop
Let’s start at the beginning. Choose the right shade of gray. There are many different shades of gray available, so it is important to select one that complements your subject and the overall mood of your image. For example, a lighter gray might be better for a soft and romantic portrait, while a darker gray might be more suitable for a more dramatic look. In both instances, remember to consult with your client to ensure that you get the correct gray that aligns with what they have in mind.
Also, pay attention to the composition of your image. While you are using a backdrop, still be mindful of dirty spots or stands that might be in your frame. Make note of them and work around them, or simply remove them during editing.

Use another light source to change the lightness and colour of your gray backdrop
Certainly, there are various shades of gray backdrops available, including dove gray, fashion gray, and others. However, it's worth noting that using an additional light source cleverly allows you to modify both the brightness and colour of your backdrop.
What is a "backdrop light?"
In photography, a backdrop light refers to a lighting source specifically positioned to illuminate the background or backdrop behind the main subject. The purpose of a backdrop light is to create separation between the subject and the background, adding depth and visual interest to the image.
By strategically placing a light source directed toward the backdrop, photographers can control the brightness and colour of the background independently of the main subject. This technique is commonly used in studio photography, especially when working with solid-coloured backdrops like gray, white, or black.
The use of a backdrop light helps prevent the background from merging with the subject and allows for creative control over the overall lighting setup. It enables photographers to achieve various effects, from evenly lit backdrops for a clean look to more dramatic and dynamic effects by selectively illuminating parts of the background.
Overall, a backdrop light is a valuable tool in a photographer's toolkit for achieving effective lighting and enhancing the visual impact of the image by giving attention to the background.
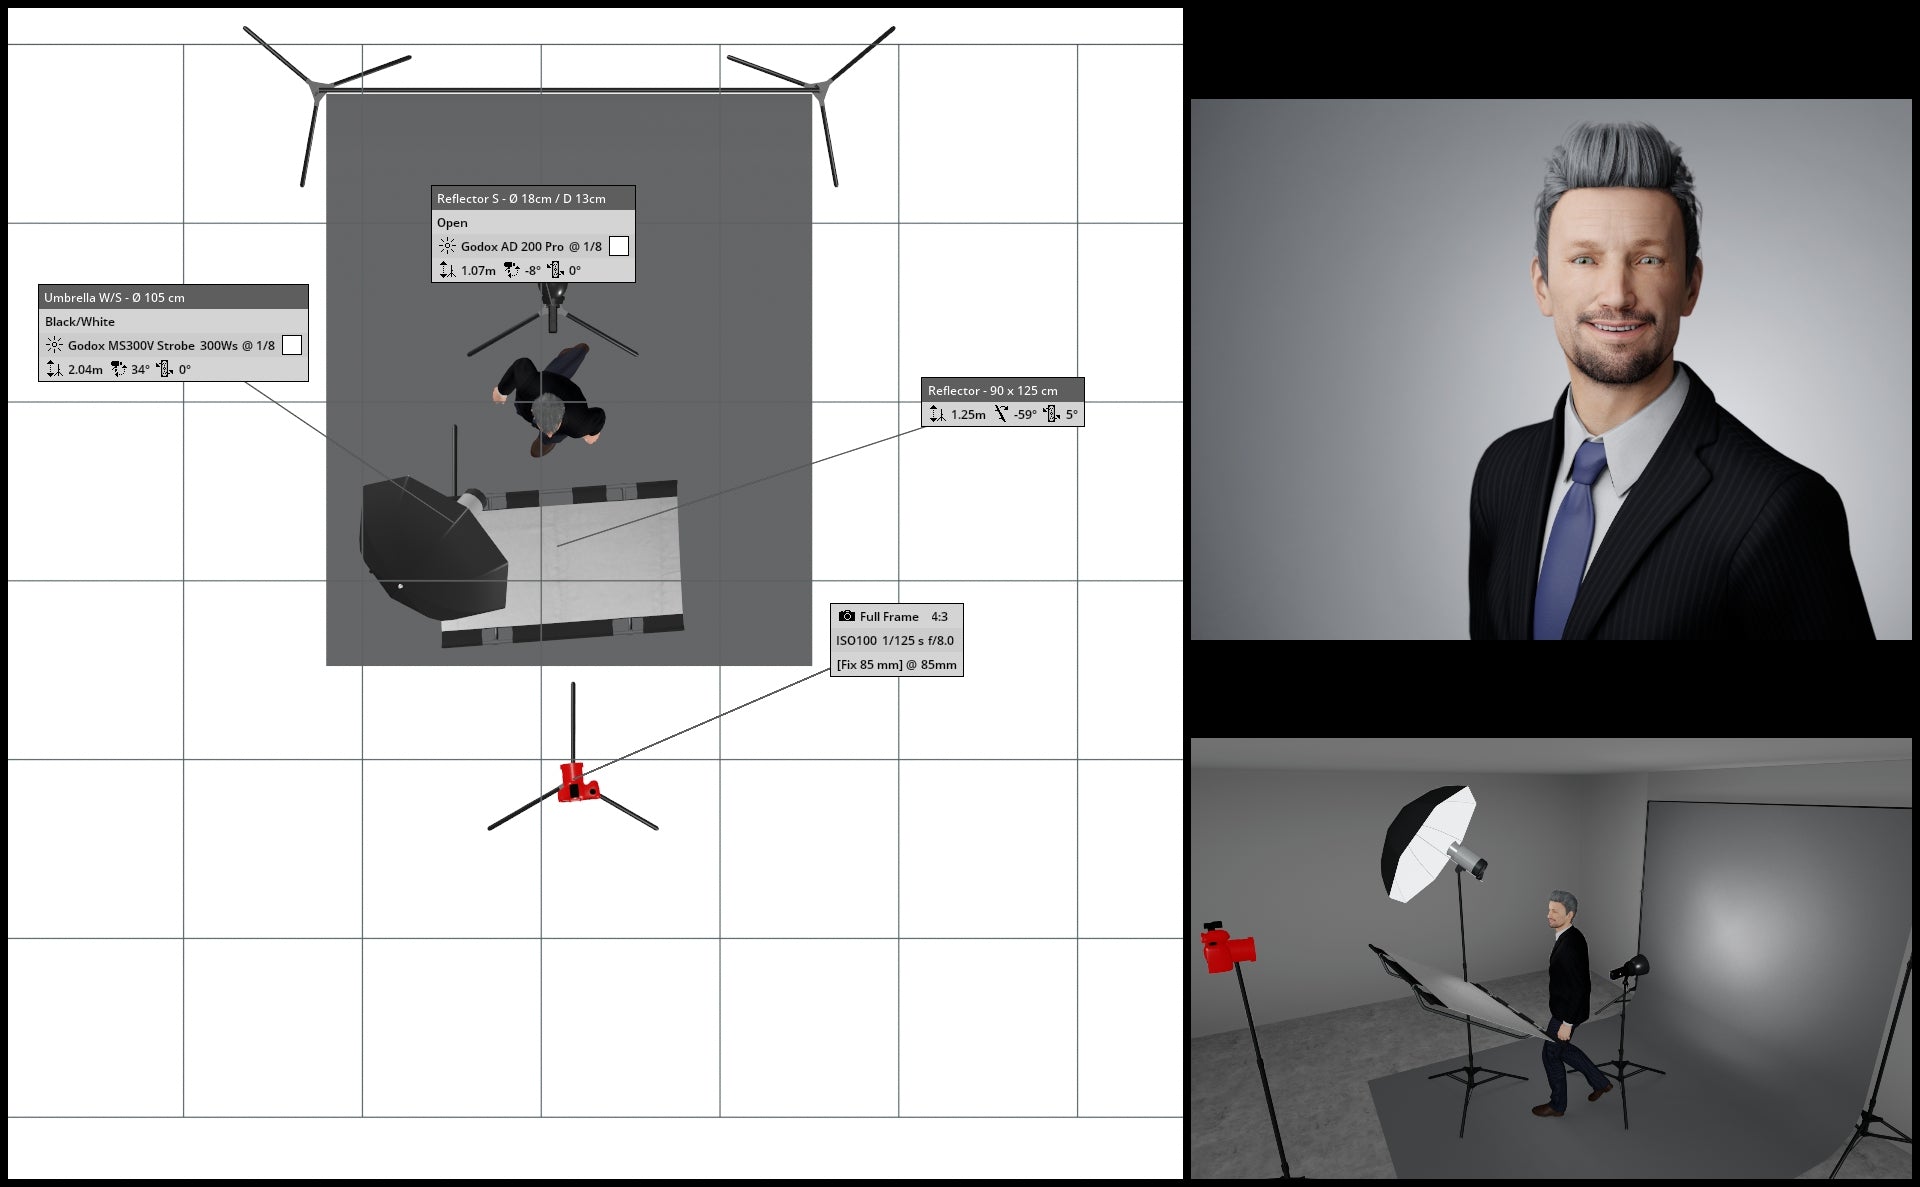
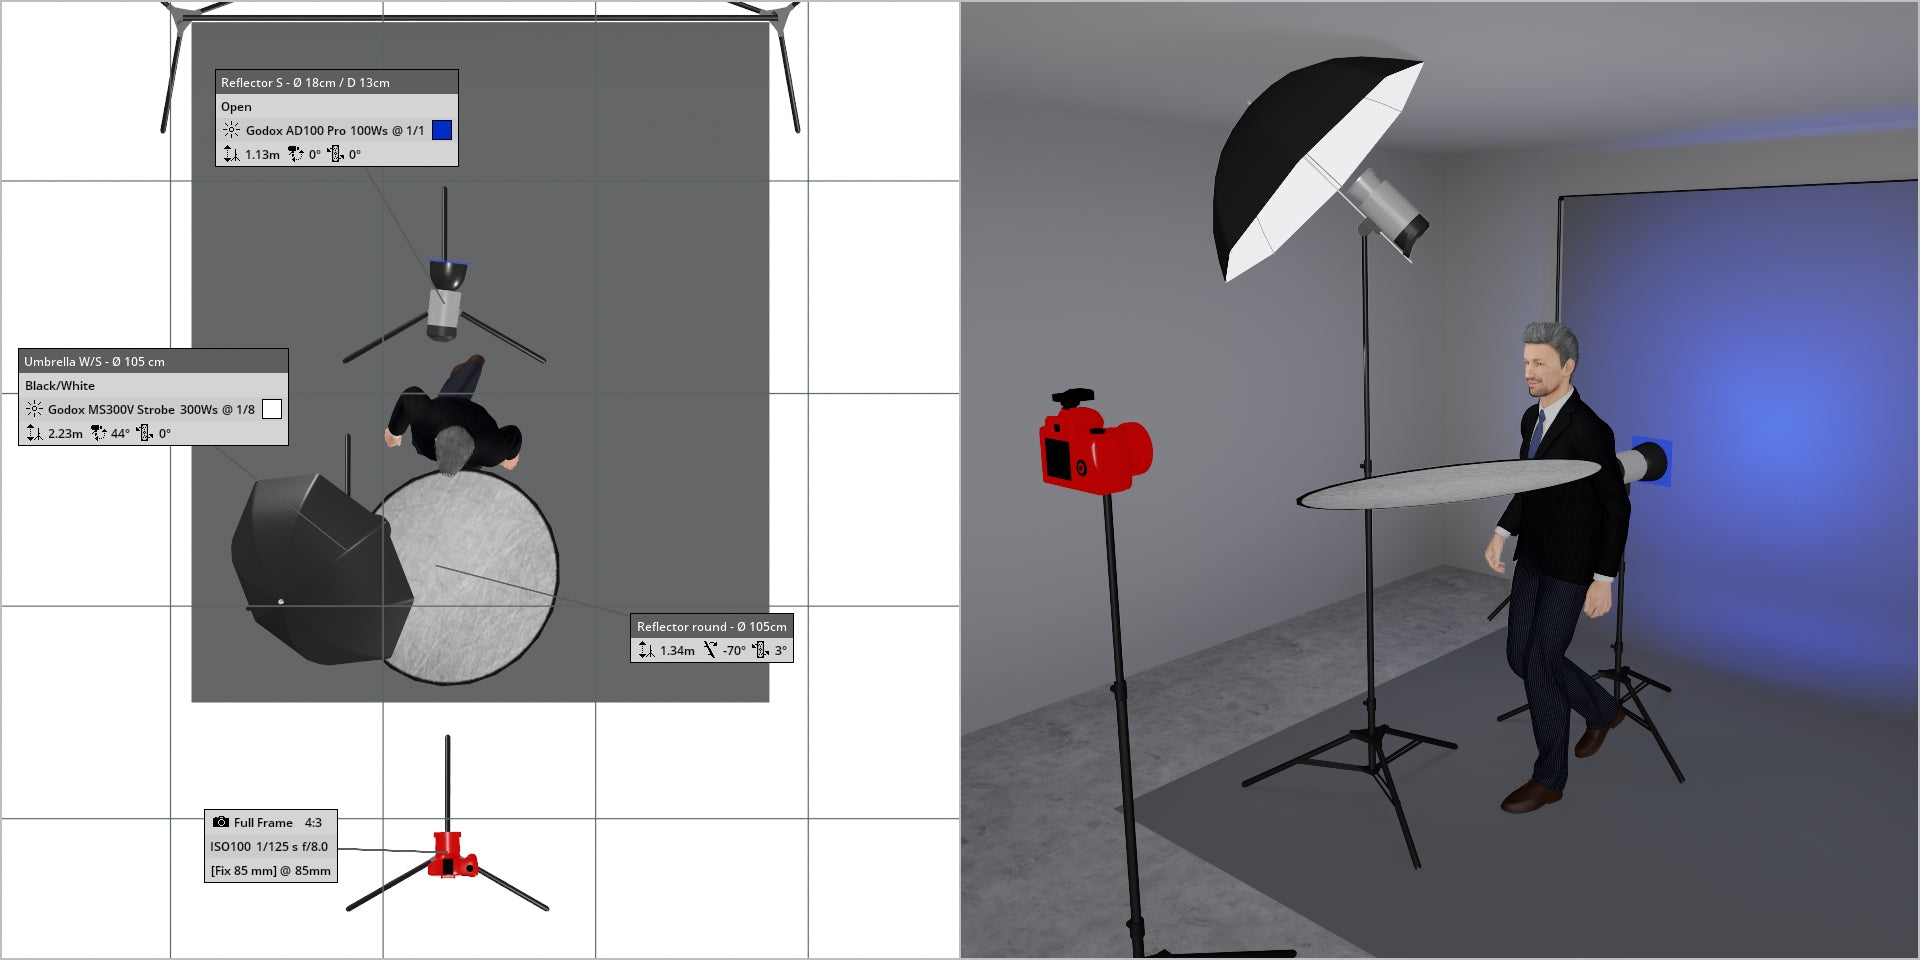
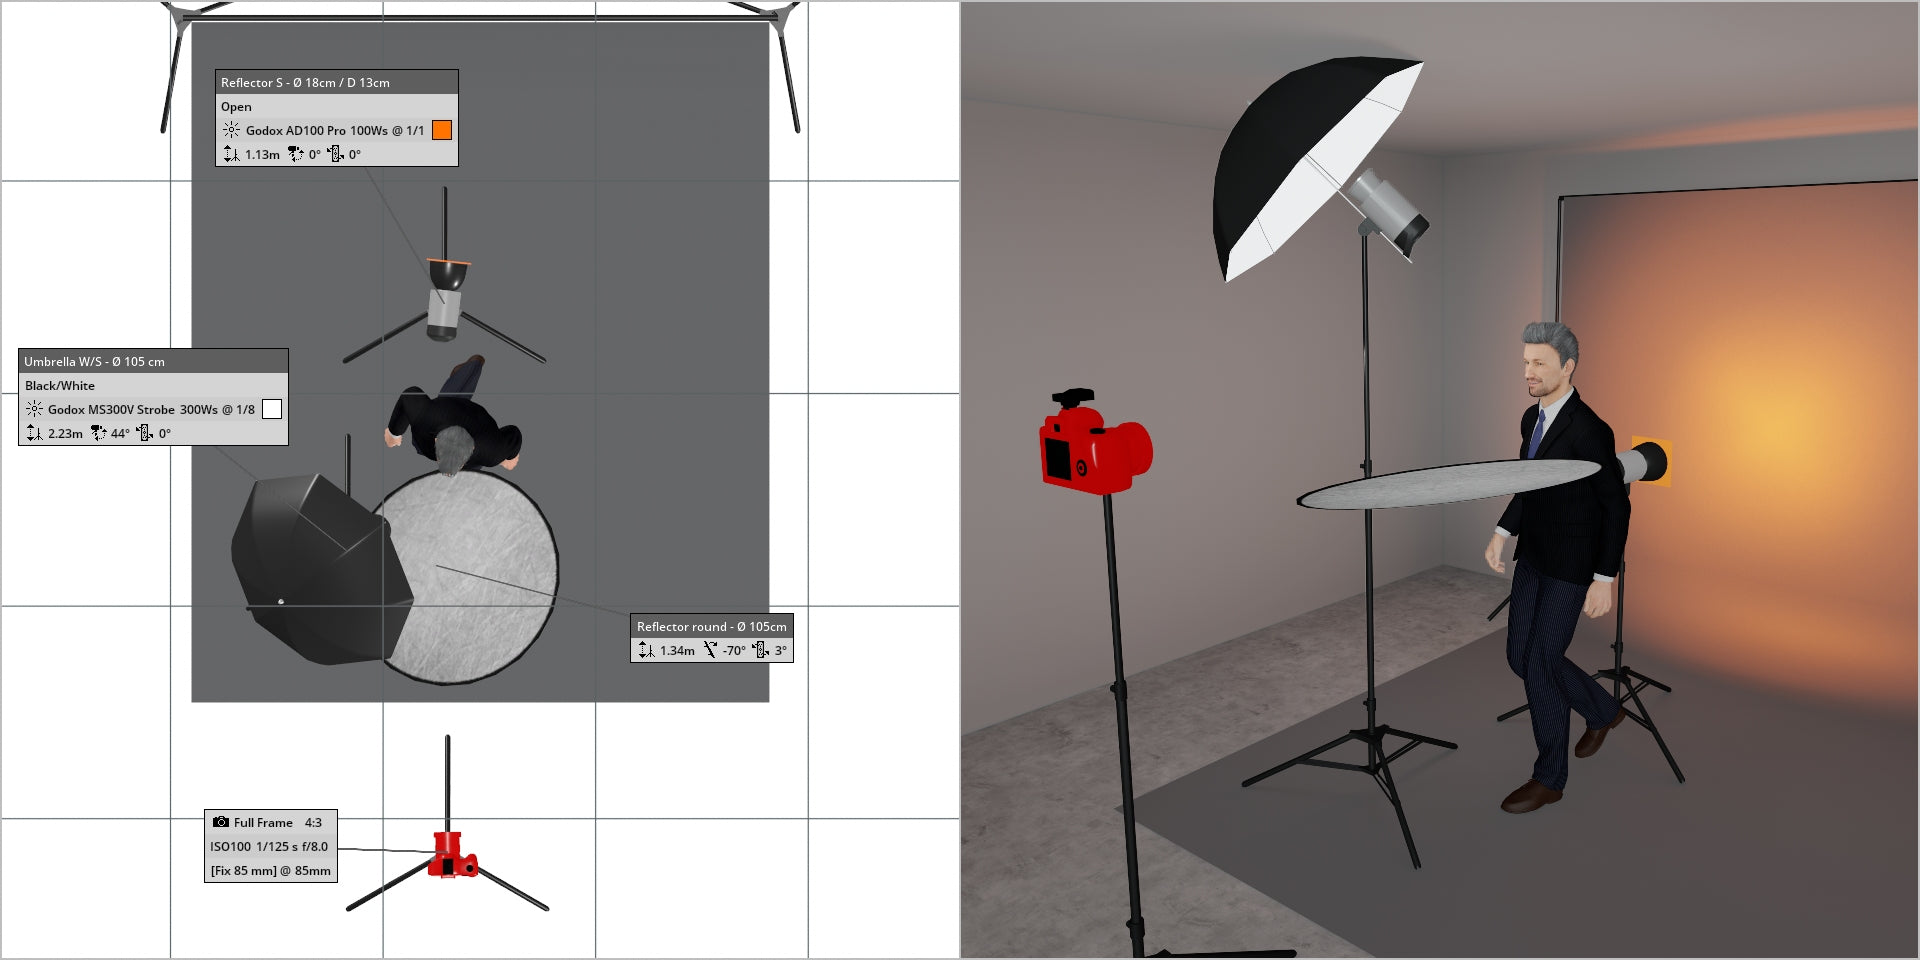
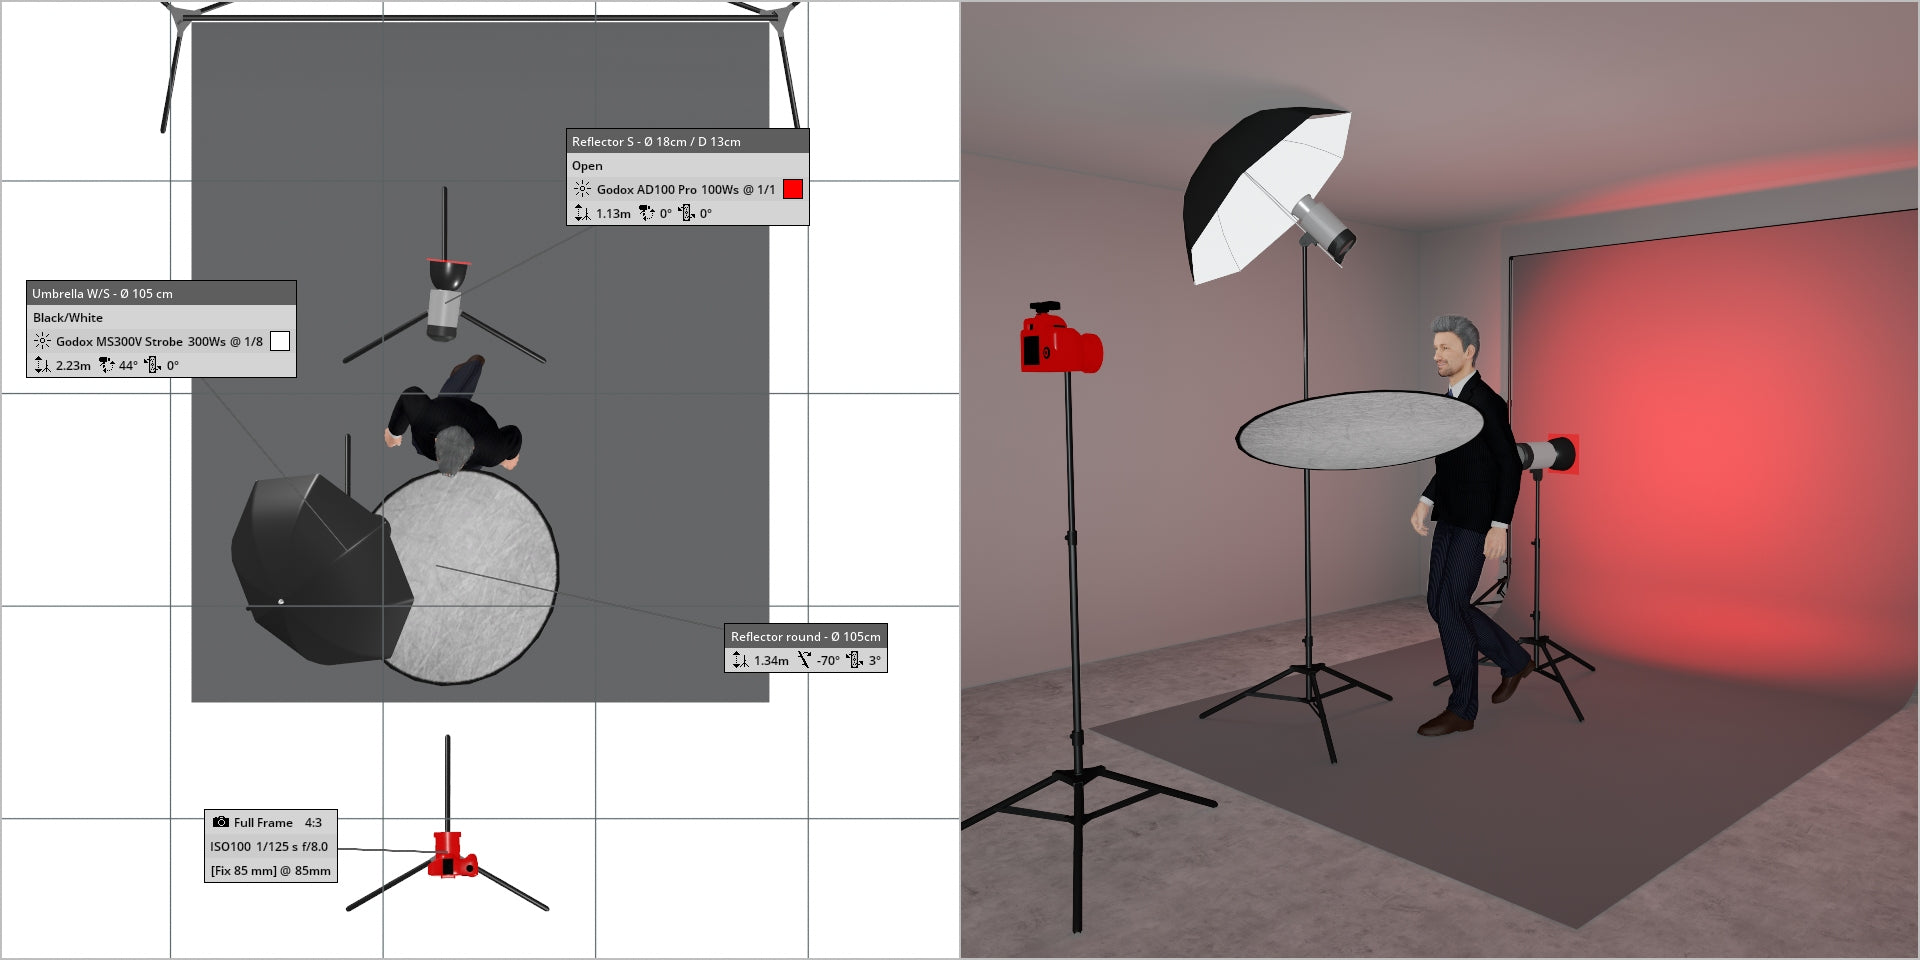
In the illustrations below, a backdrop light (specifically, a Godox AD200 Pro) is placed behind our subject, directed straight at the gray backdrop. By adjusting the power setting of the backdrop light, we can easily achieve a lighter or darker backdrop.

(above) Backdrop light set at 1/1
Key light set at 1/8
Camera Settings:
f/8.0
1/125th
ISO100
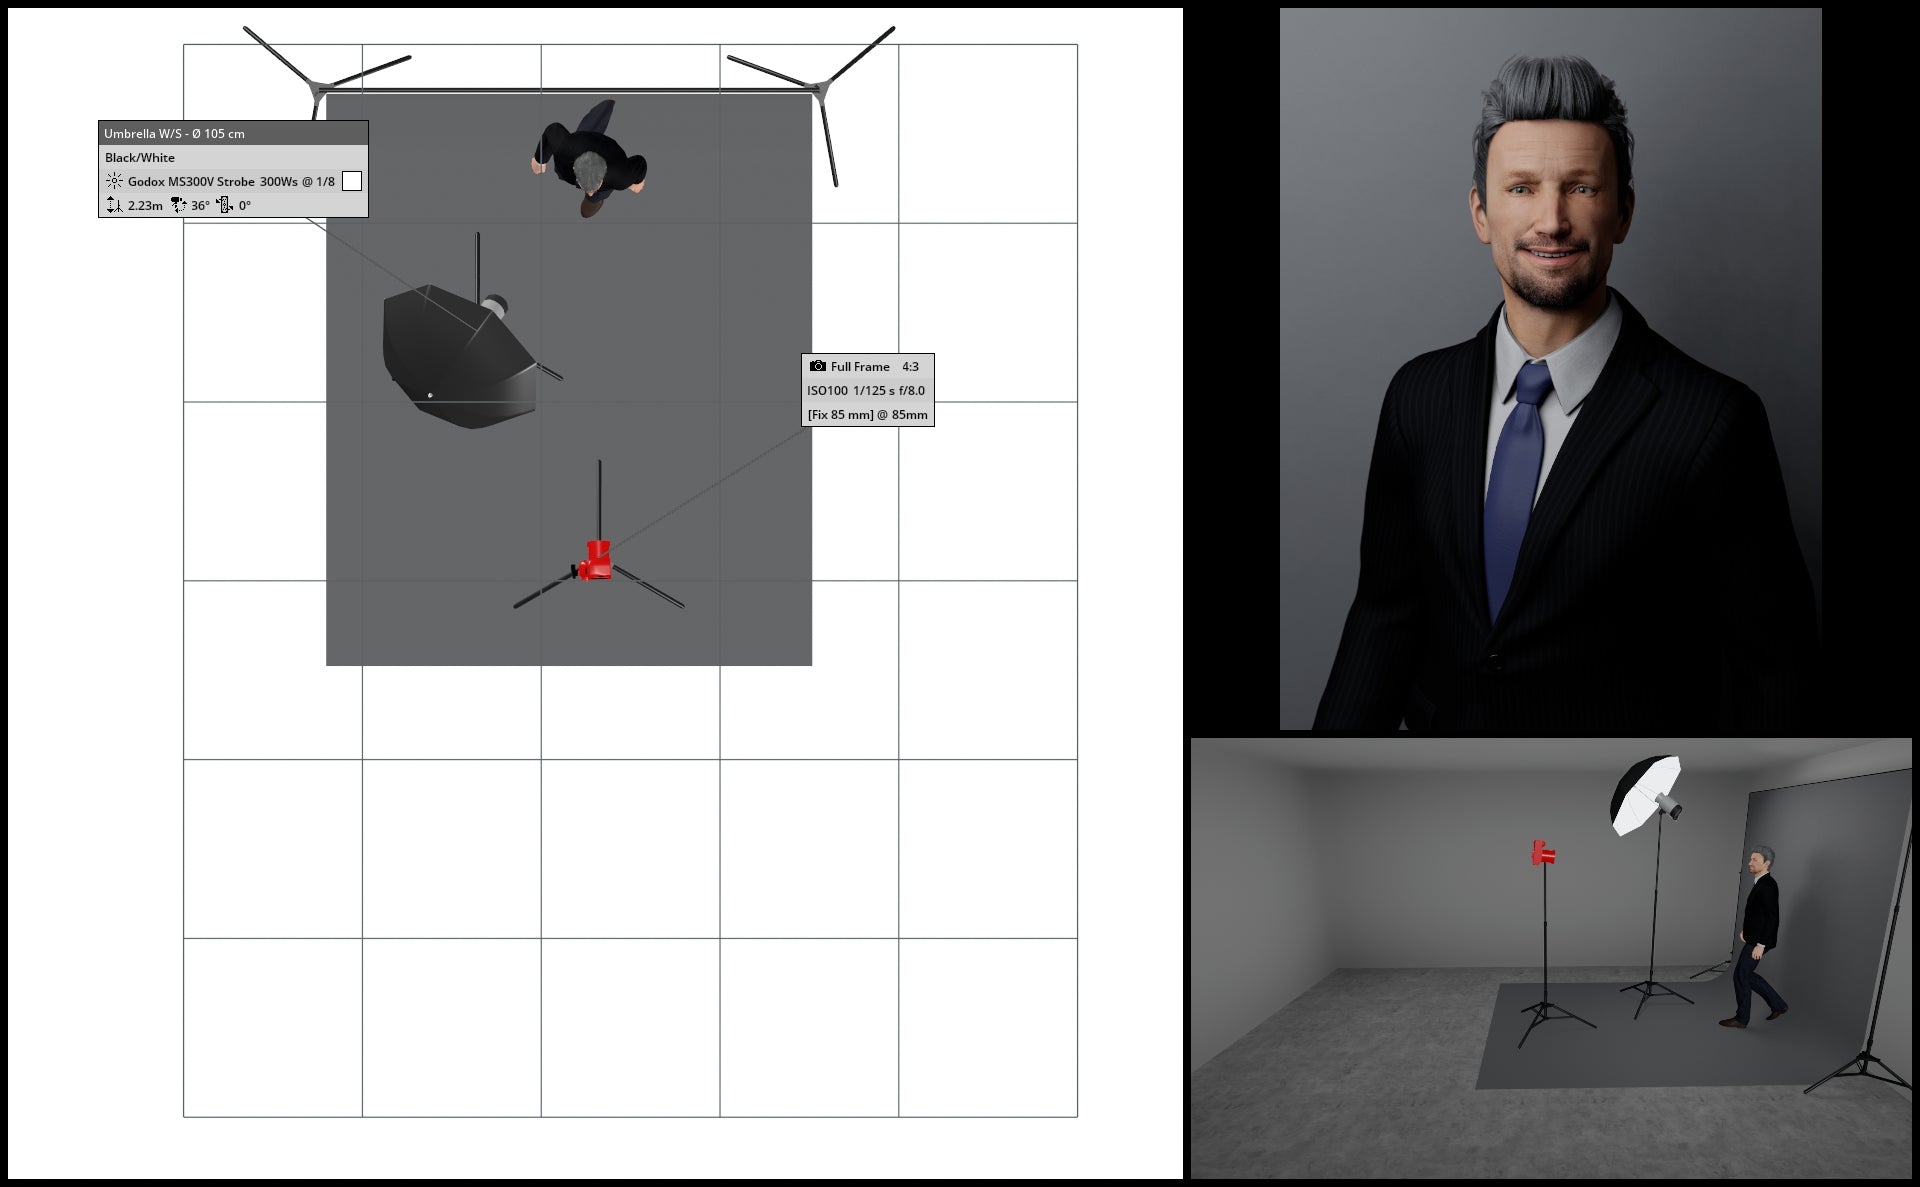
(above) Backdrop light set at 1/8
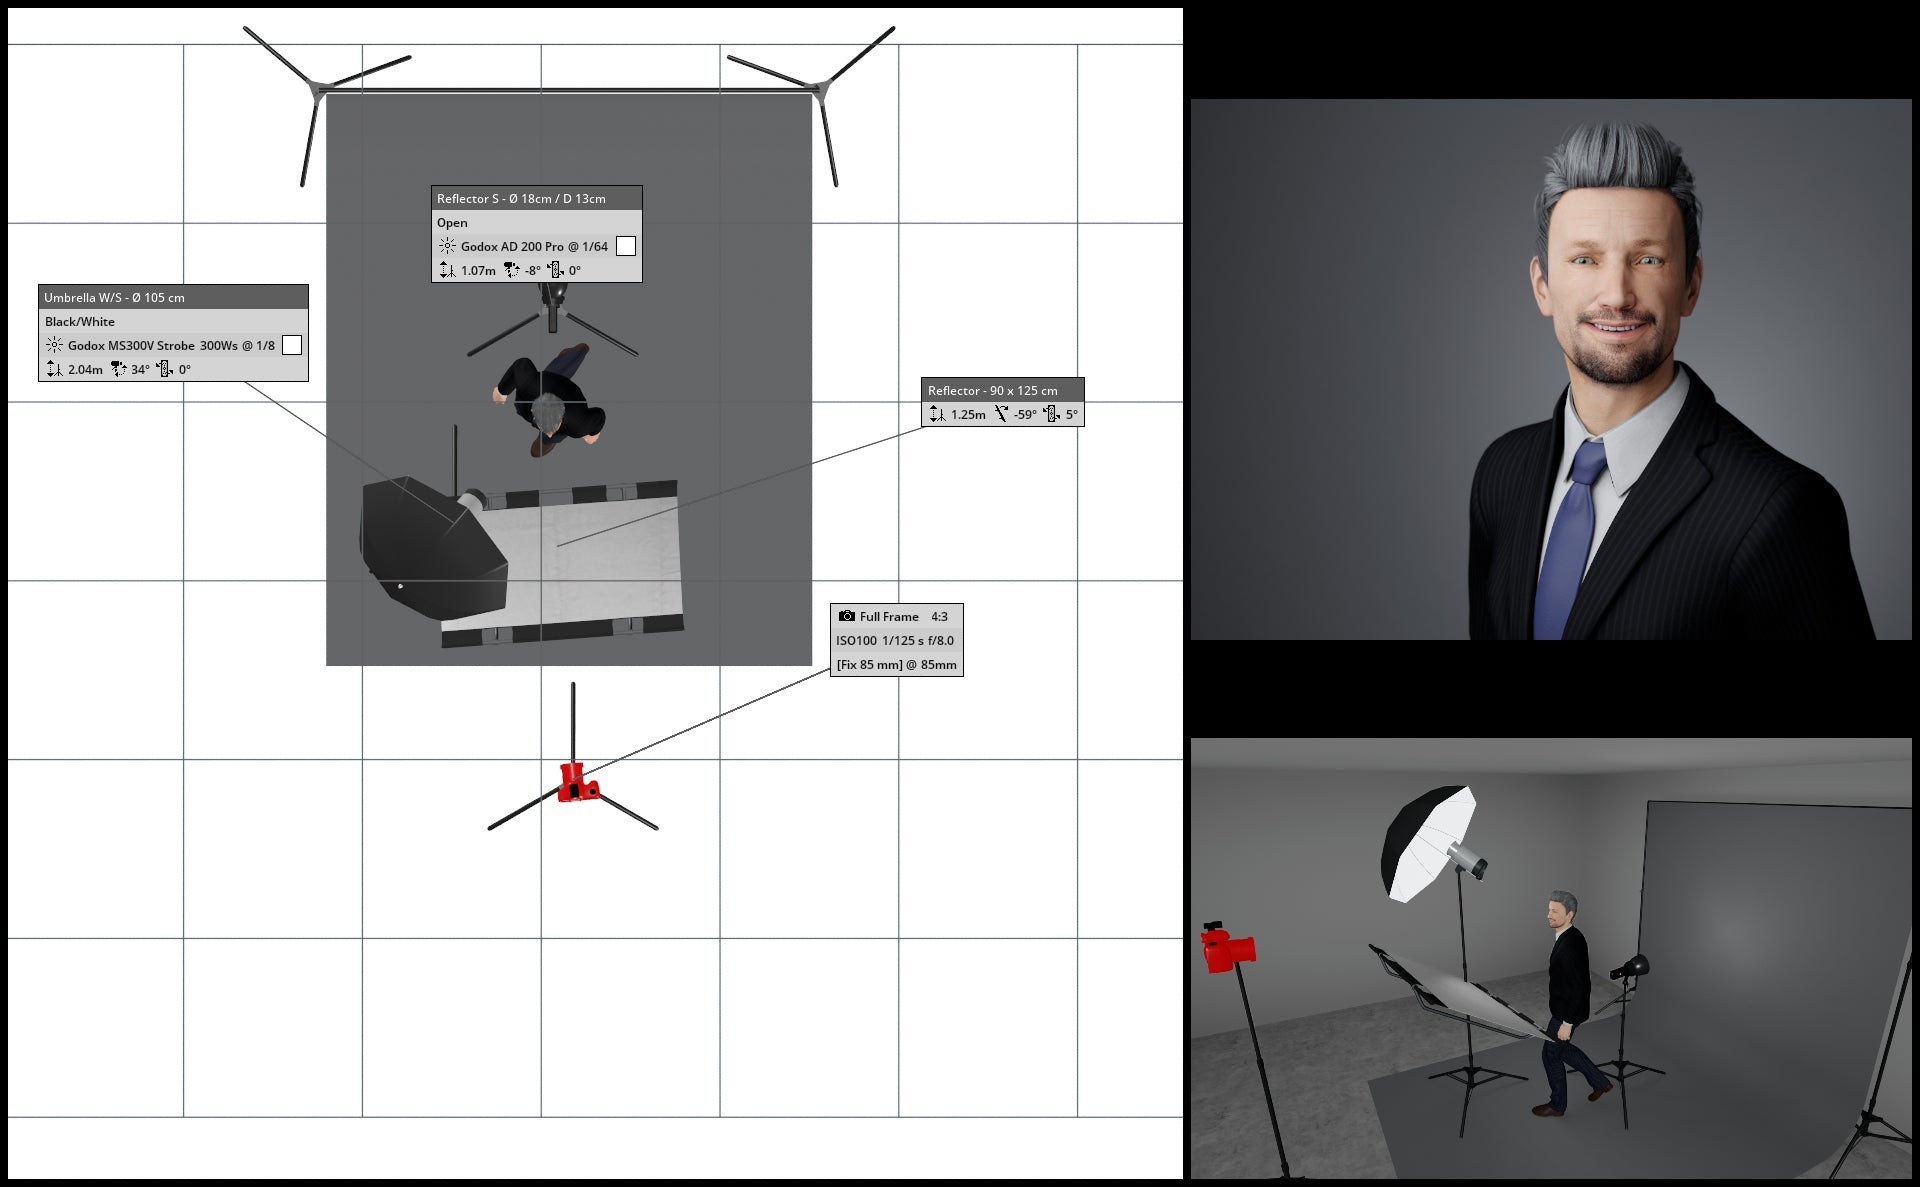
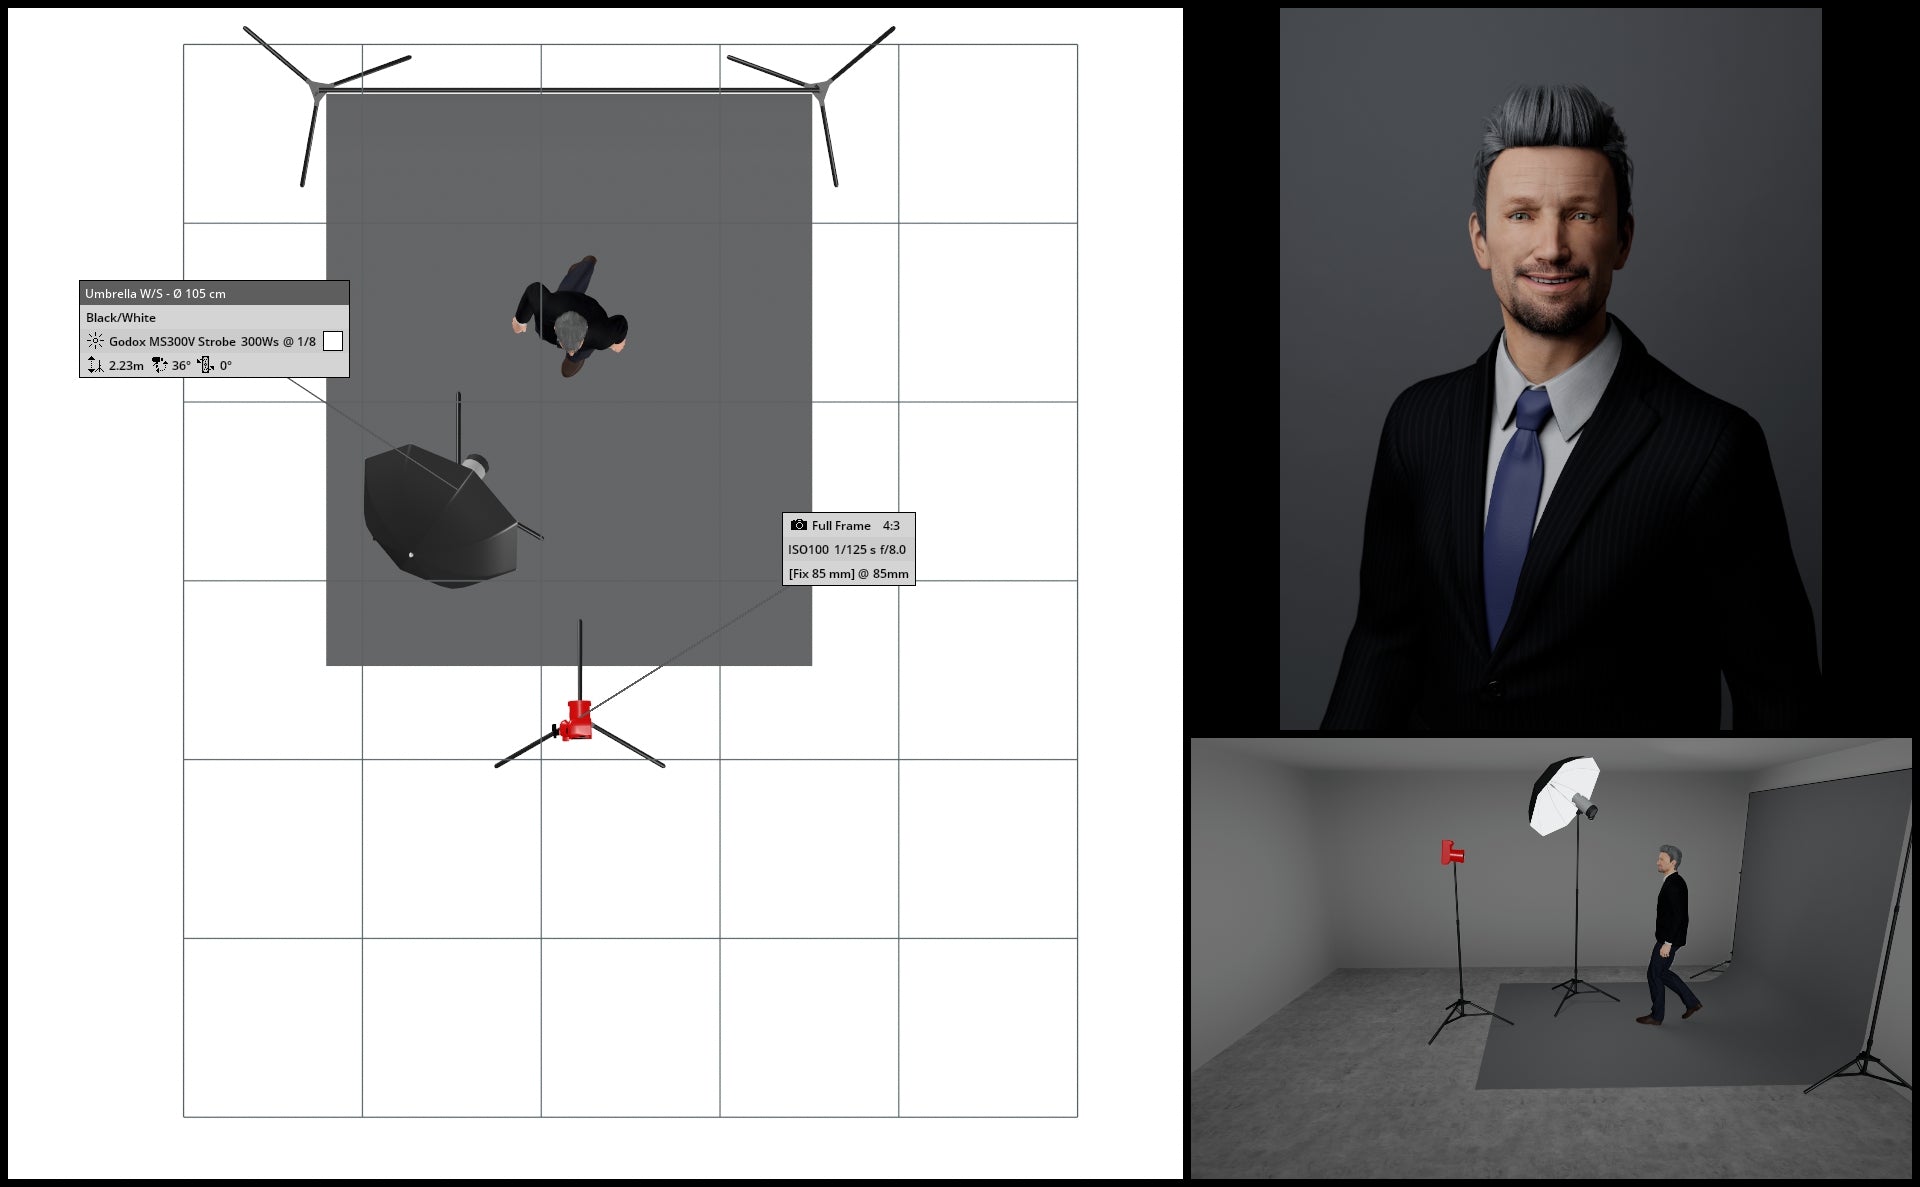
(above) Backdrop light set at 1/64
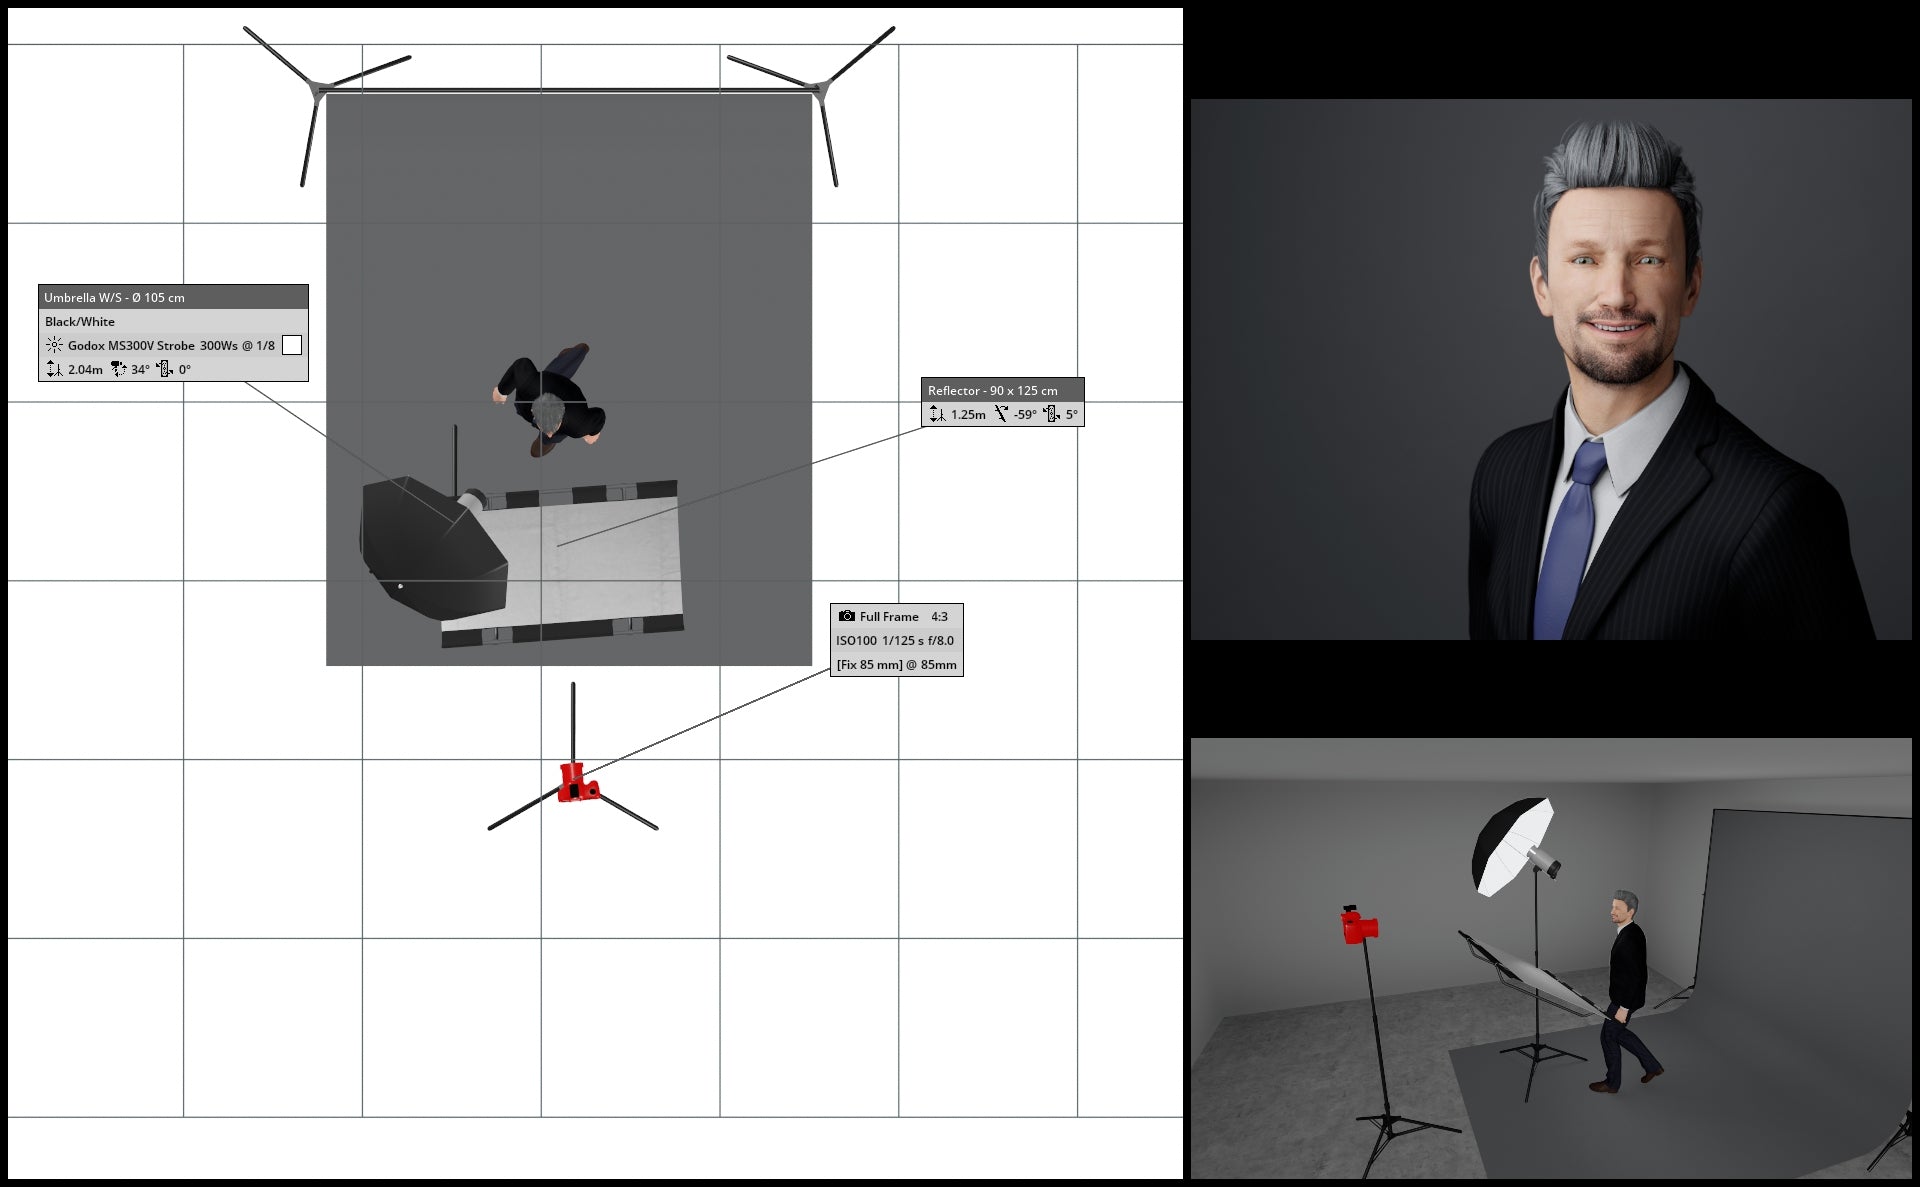
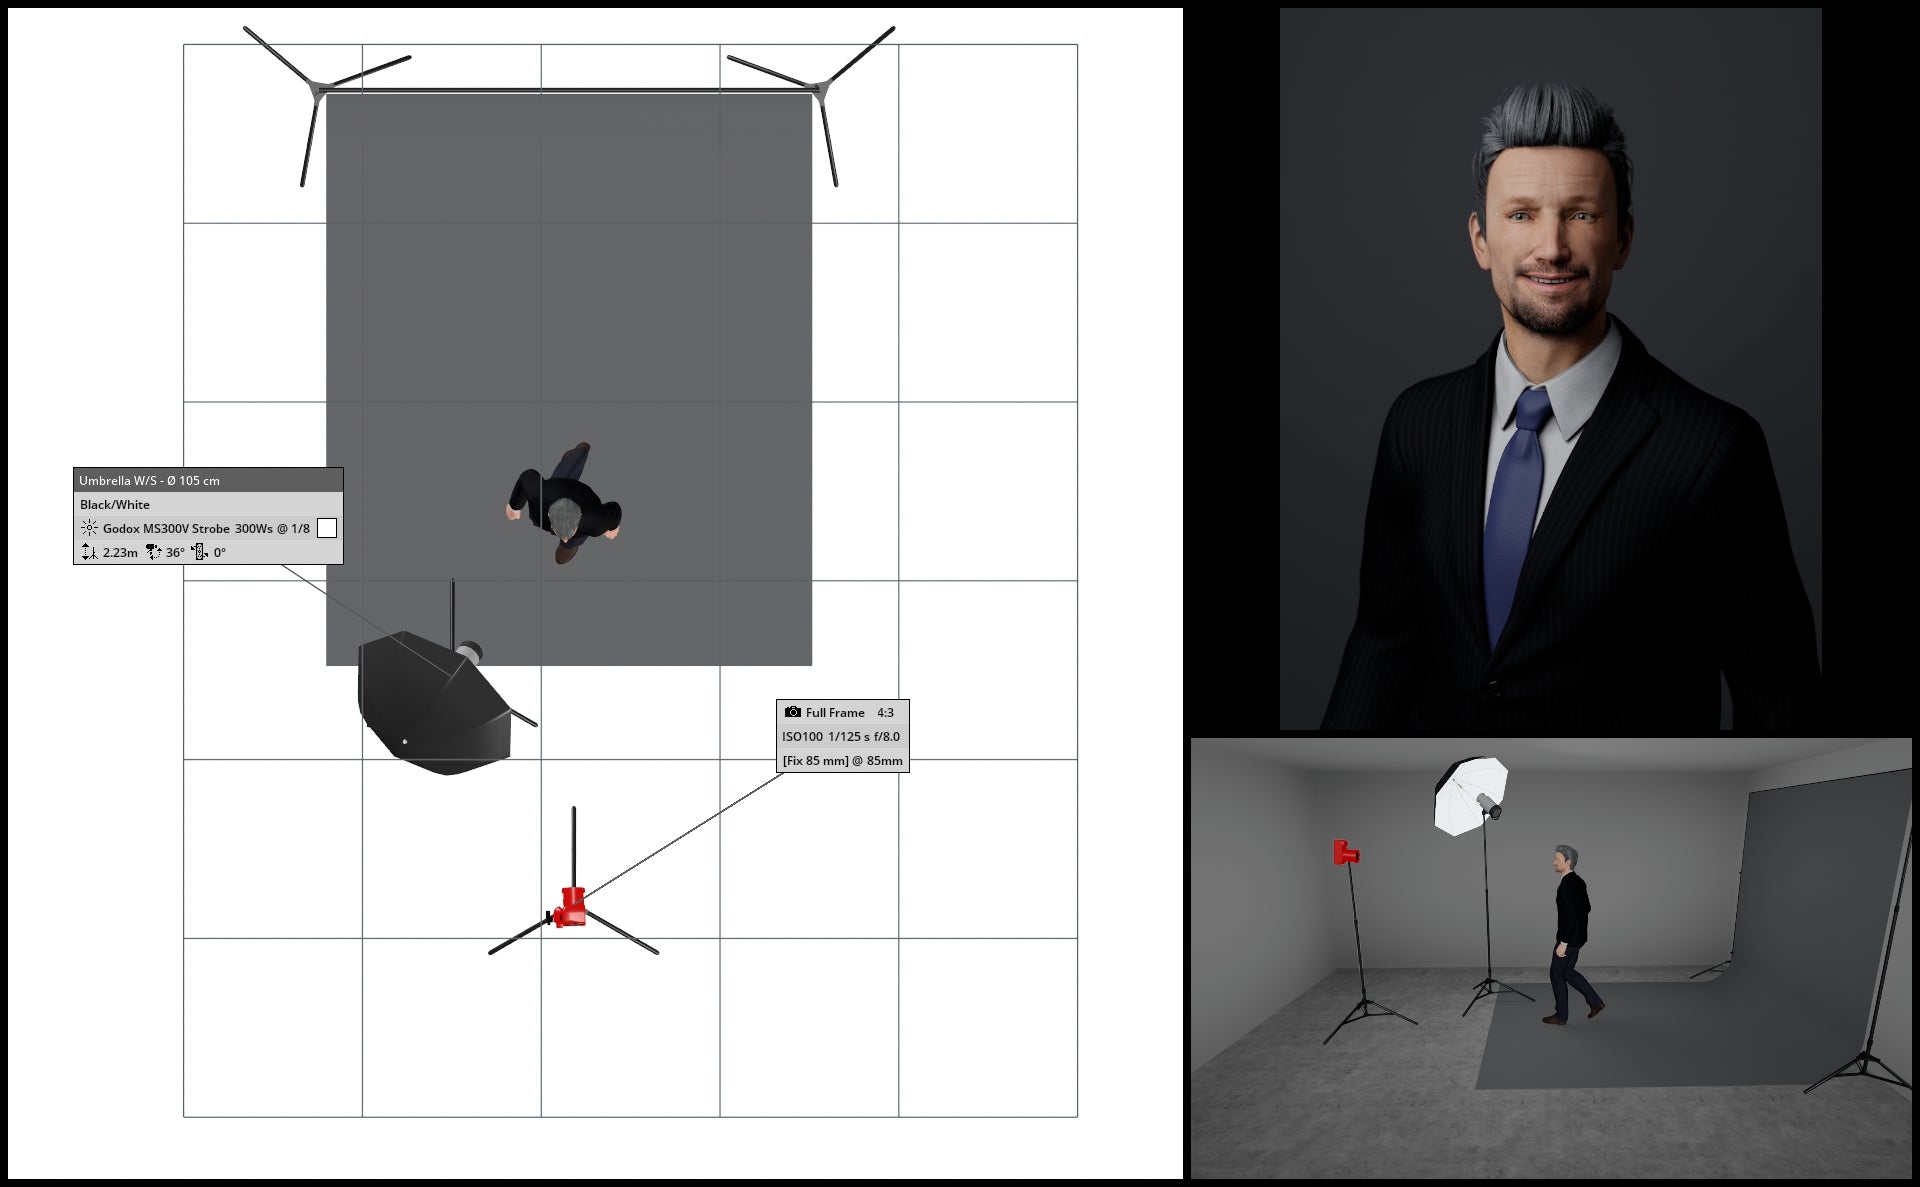
(above) No backdrop light used
Use a honeycomb grid to create a spotlight effect
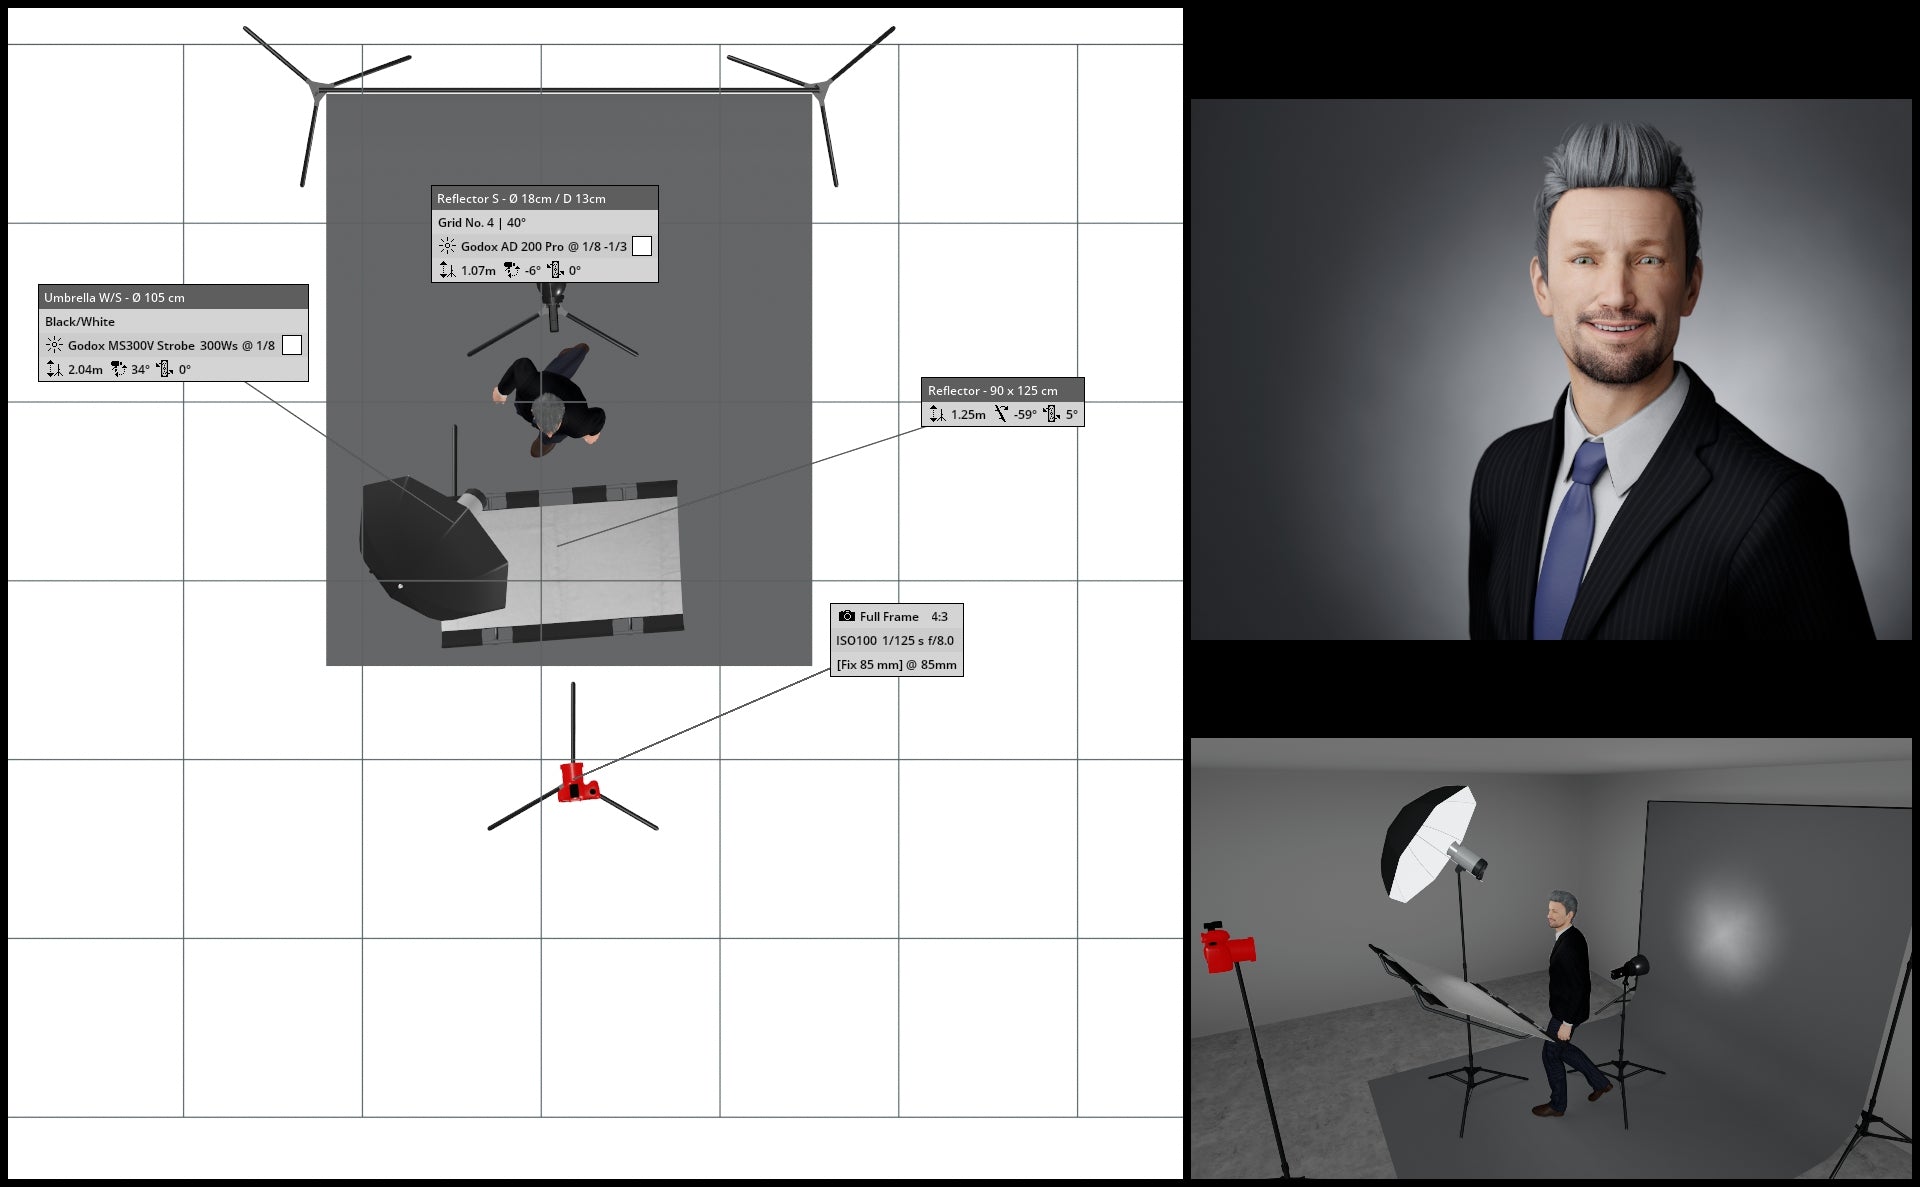
(above) A honeycomb grid can be used on the backdrop light to create a focused spotlight effect
What is a "honeycomb grid?"
In photography, a honeycomb grid is an accessory used with lighting equipment, such as softboxes or reflectors, to control and direct the spread of light. It consists of a grid of cells made from a honeycomb-like material, typically made of metal or plastic. This grid is designed to be attached to the front of a light modifier, restricting the light emitted from the source and creating a more focused and directional beam.
The honeycomb grid is especially useful when a photographer wants to narrow down the spread of light to a specific area without causing spill or unwanted reflections in surrounding areas. It helps to achieve a more controlled and precise lighting effect, often used in portrait photography to highlight specific features or create a spotlight effect.
Photographers can choose different grid sizes (measured in degrees) to control the degree of spread, with smaller grids producing a more focused and concentrated beam of light. Overall, the honeycomb grid is a valuable tool for photographers seeking to shape and control the illumination in their shots with greater precision.
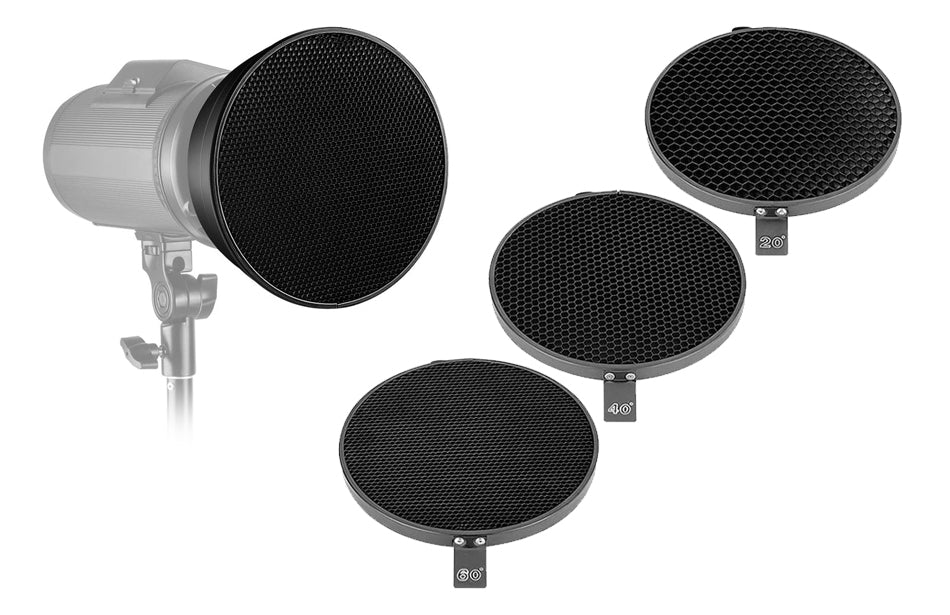
(above) An example of a honeycomb grid system that can be used together with a standard reflector dome
Use gels to add a splash of colour to your gray backdrop
Gels, also referred to as colour filters, offer a means to alter the color of your backdrop. This colour modification can significantly impact the mood, ambiance, and overall aesthetic of an image. Warmer hues contribute to an inviting appearance, while cooler tones create a more dramatic, serious, and subdued atmosphere.
What are “gels?”
In photography, a gel refers to a coloured, transparent material that is placed in front of a light source to modify the colour of the light. Gels are commonly used to alter the mood, tone, and overall atmosphere of a photograph by introducing a specific colour cast. These thin, often flexible, sheets come in a variety of colours and are typically made of heat-resistant plastic.
Photographers use gels to achieve creative lighting effects or to correct colour imbalances in a scene. For example:
- Creative Lighting Effects: Gels can be used to add warmth (using orange or red gels) or coolness (using blue gels) to a scene. They can also be employed to create dramatic or stylized effects, such as using coloured gels to simulate moonlight or enhance the ambiance of a particular setting.
- Colour Correction: In situations where the ambient light has a colour temperature different from the artificial lighting, gels can be used to balance the colours. This is particularly useful when shooting under mixed lighting conditions, such as combining daylight with indoor artificial lighting.
- Highlighting or Separation: Gels can be strategically used to highlight specific elements in a scene or to create separation between the subject and the background by introducing contrasting colours.
Gels are often used with external flashes, strobes, or continuous lighting sources in both studio and outdoor photography. Photographers attach gels to the light source or use gel holders specifically designed for this purpose.
Experimenting with different gel colours opens up a range of creative possibilities for photographers to express their artistic vision and enhance the visual impact of their images.
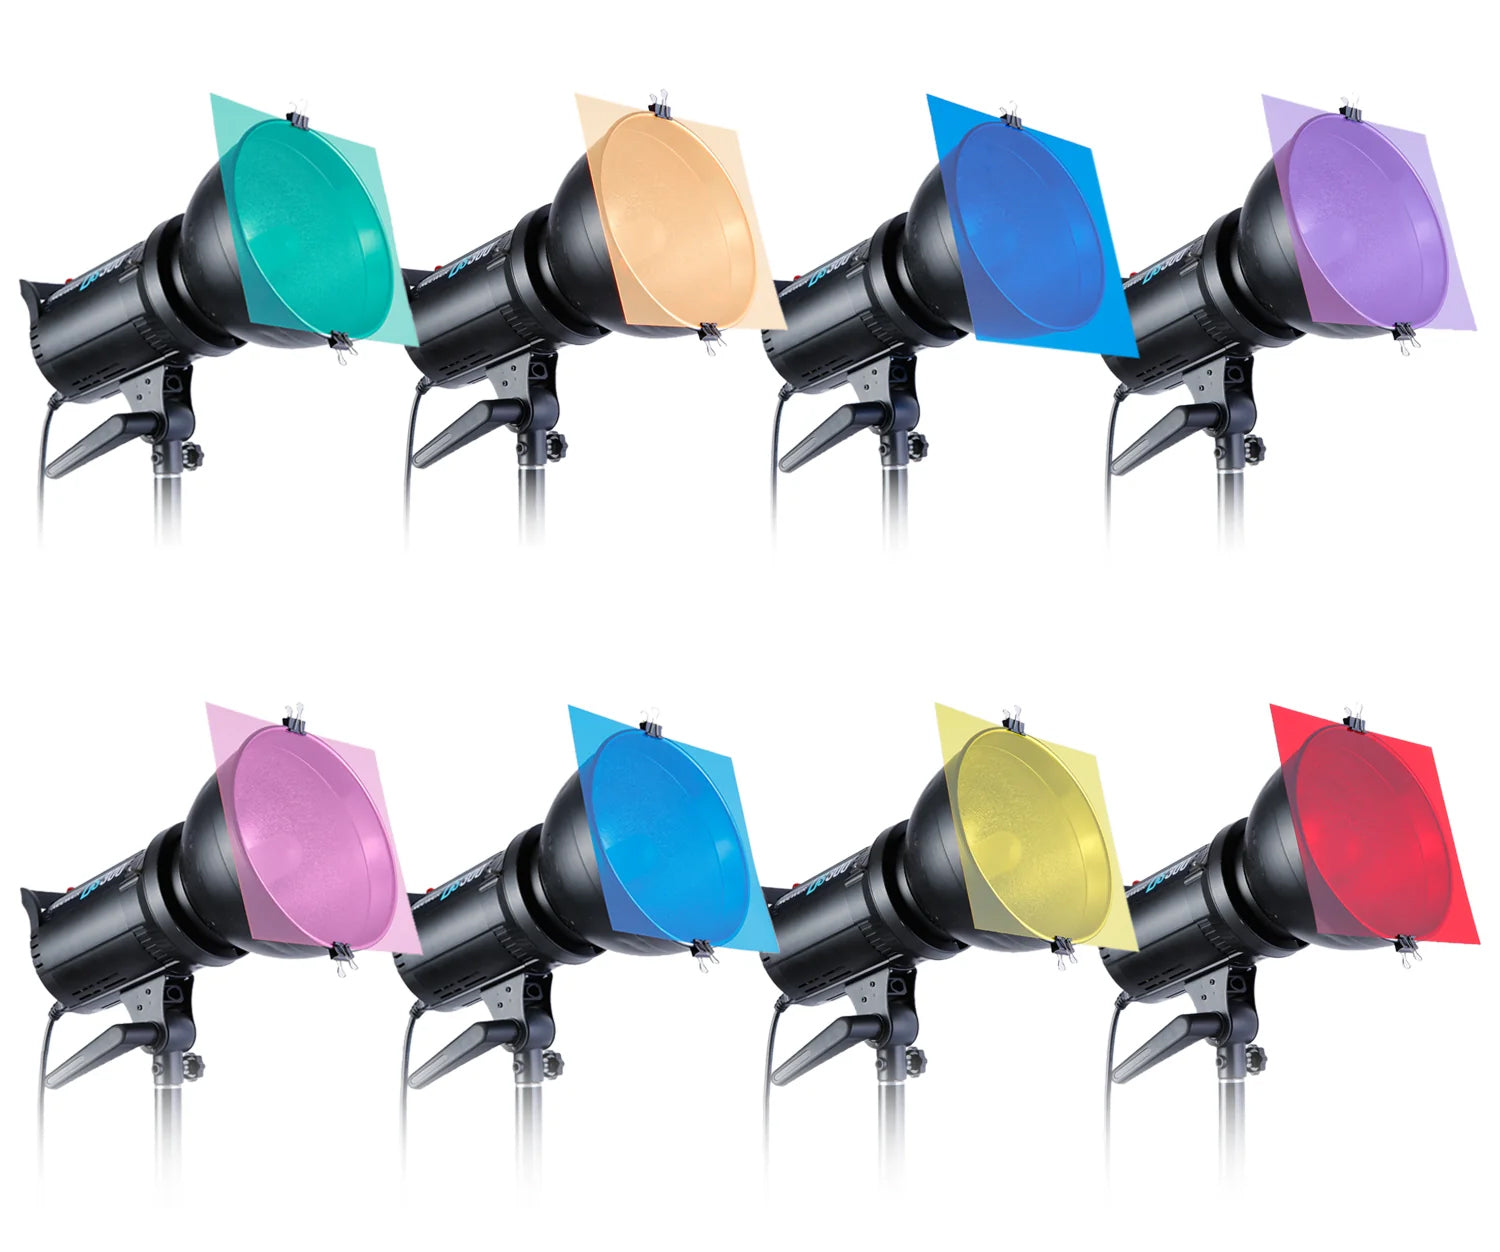
(above) Examples of gel sheets attached to a standard reflector dome
Let's see some results:


I like to move it, move it...
An alternative method to adjust the brightness or darkness of your gray backdrop involves relocating both your light source and subject away from the backdrop. By moving your subject farther from the backdrop, you effectively reduce light spillage from your main / key light affecting the backdrop.
In the below illustrations, we see what happens when we move both subject and key light further and further away from the backdrop.
If all else fails, Photoshop!
Finally, you can also use post-processing software to darken or lighten a gray paper backdrop. This is a good option if you want to make precise adjustments to the brightness and contrast of the backdrop. For example, the latest version of Lightroom has an option that allows you to select the background with a single click, making the editing process much faster.
In Photoshop specifically, you can:
Darken the backdrop: Use the Levels or Curves adjustment layers. Simply drag the black slider to the right to darken the backdrop. You can also use the Selective Colour adjustment layer to darken or lighten specific colours in the backdrop. For example, if you want to darken the blue tones in the backdrop, you would select the blue channel and drag the black slider to the right.
Lighten the backdrop: Use the Levels or Curves adjustment layers. Simply drag the white slider to the left to lighten the backdrop. You can also use the Selective Colour adjustment layer to darken or lighten specific colours in the backdrop. For instance, if you want to lighten the green tones in the backdrop, you would select the green channel and drag the white slider to the left.
About Andrew Basson
My name is Andrew. I completed my Adobe certification back in 2007, and since then, I have been active in the photography community, continuously enhancing my skills and knowledge as a professional photographer.
I have covered numerous riots, as well as commercial events and portraits. However, I have recently slowed down, and now my primary focus has shifted towards providing free education and assistance to photographers who may be facing challenges.
Website: andrewbasson.com

This page contains affiliate links. By clicking on these links, the author may get paid a commission on successful online sales


Comments (0)
There are no comments for this article. Be the first one to leave a message!